
How to Root Galaxy Note 8 Snapdragon
For your convenience and better understanding, we have split the complete instructions into 5 different steps. Make sure that you follow them in the mentioned order and do not skip any of the steps.
Step 1: Perform Factory Reset and Enter Download Mode on Galaxy Note 8
The first step of the rooting process is to boot your Note 8 into the stock recovery mode and perform a factory reset through it.
To do this, power off your phone first. Then hold the Volume Up, Bixby, and Power keys simultaneously to boot your phone into the stock recovery mode.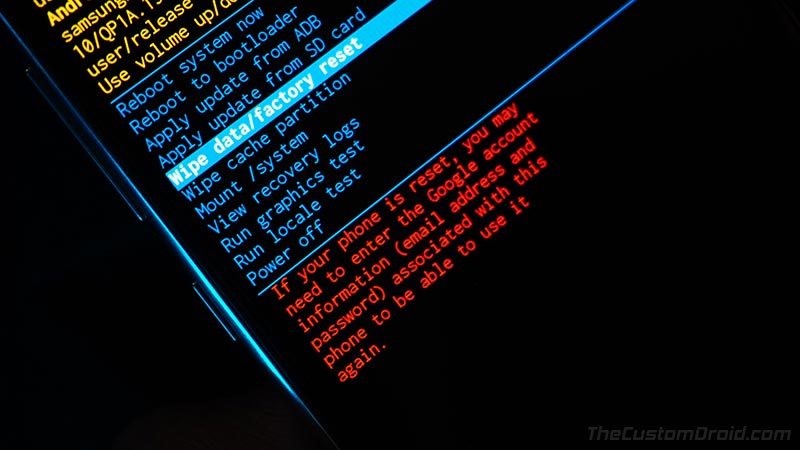
Once in recovery mode, use the Volume buttons to select the ‘Wipe data/factory reset’ and press the power button to confirm the selection. When prompted, select ‘Factory data reset’ to confirm.
After that, select the ‘Reboot to Bootloader’ option in the stock recovery to boot your Galaxy Note 8 into Download Mode. Connect the phone to the computer while it’s in Download Mode.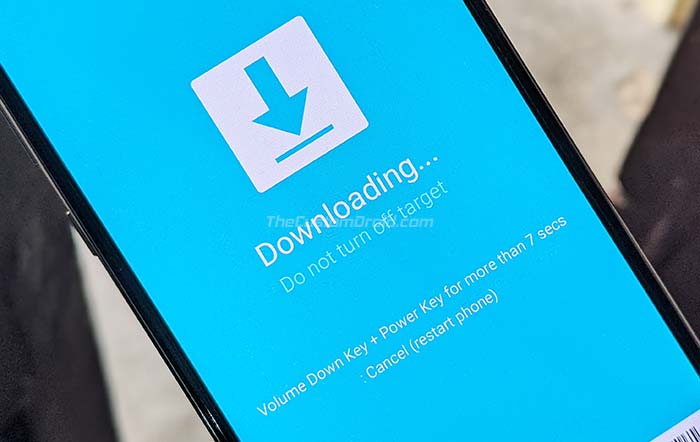
Step 2: Flash Combination Firmware using Odin
Now, you have to flash the combination firmware on your Galaxy Note 8 using the Odin tool. To do this, download the combination firmware package (COMBINATION_FA71_N950USQU8ATF1_CL13942288_QB32228349_REV00_user_mid_noship_MULTI_CERT.tar.md5.zip) to your computer.
Extract the contents of the ZIP file on your computer to get the combination firmware file (COMBINATION_FA71_N950USQU8ATF1_CL13942288_QB32228349_REV00_user_mid_noship_MULTI_CERT.tar.md5).
To flash the combination firmware, you will need the modded Odin v3.13.1 tool by ‘Raymonf’. You can download it from the Odin download repository that I maintain. After downloading, extract the ZIP file and then double-click the ‘Modded Odin v3.13.1 Raymonf.exe‘ executable to launch Odin on your computer.
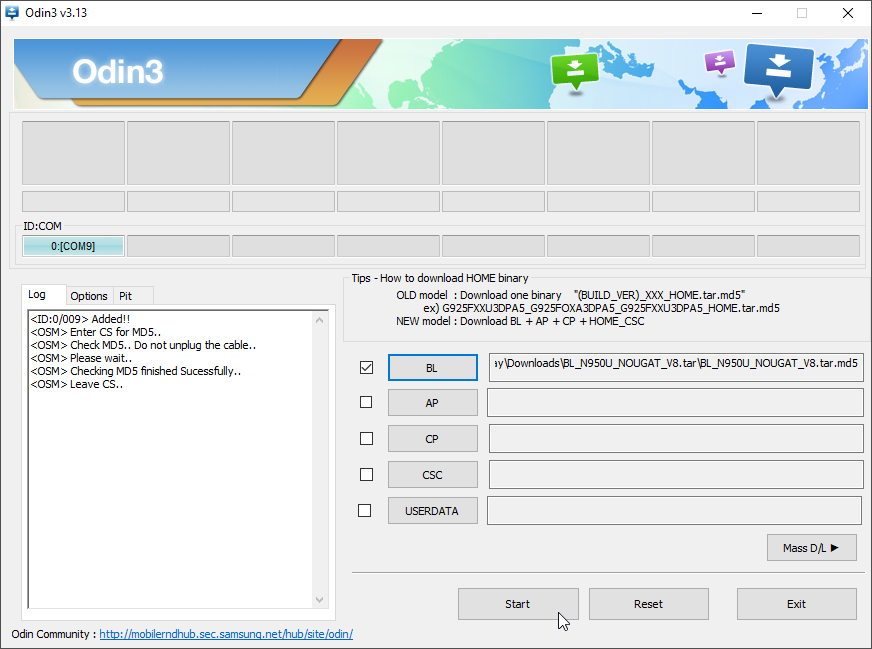
The Odin tool GUI should now be shown on your PC’s screen and it should display the COM port to which your Note 8 is connected. Click the ‘AP‘ button and select the combination firmware file to load it in the slot for flashing.
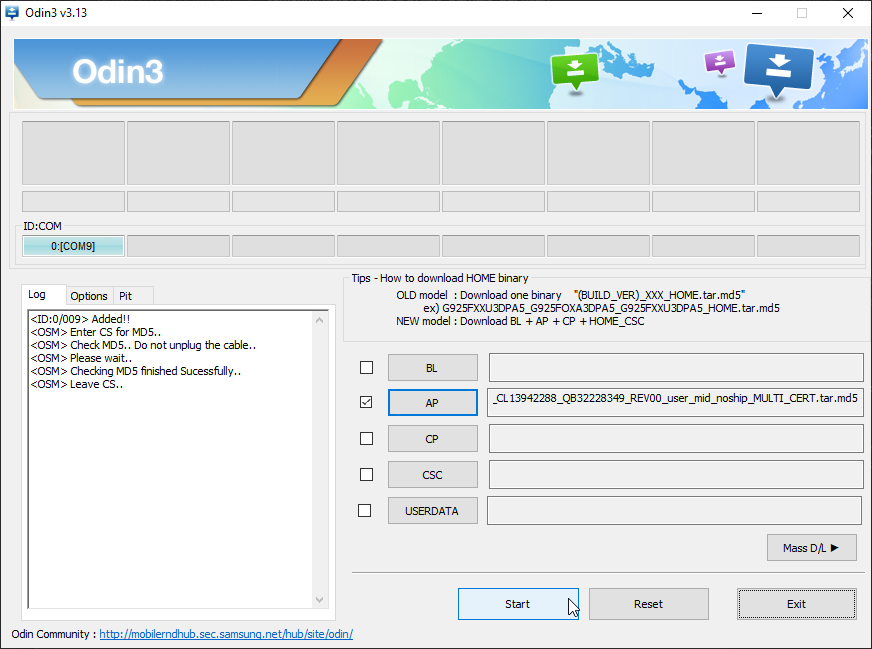
Finally, hit the ‘Start‘ button in Odin to flash the combination firmware on your Snapdragon Note 8. Once the flashing process finishes, you should see a ‘PASS!‘ message in the Odin tool and your phone will automatically reboot into the combination OS. Keep your phone connected to the computer as you’ll need it further.
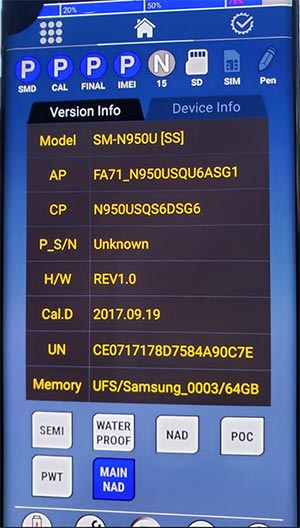
Since this is a low-level testing firmware used by Samsung internally, the UI will differ from the regular software. It should look similar to the one shown in the image below.
Step 3: Run APPS_INSTALLER.bat and reboot the phone
Now, you have to run a batch file on your computer that will sideload some required apps on your Note 8 to carry on with the rooting procedure.
With your Galaxy Note 8 now in the combination OS, connect it to the PC via the USB cable (if not already). Then download the ‘N8_ROOT.7z‘ file and extract the file on your computer using 7-zip or a similar archive utility. The extracted “N8_ROOT” folder should contain the ADB binaries, a bunch of APK files, and two Windows batch script files namely ‘APPS_INSTALLER.bat’ and ‘ROOT_INSTALLER.bat’.
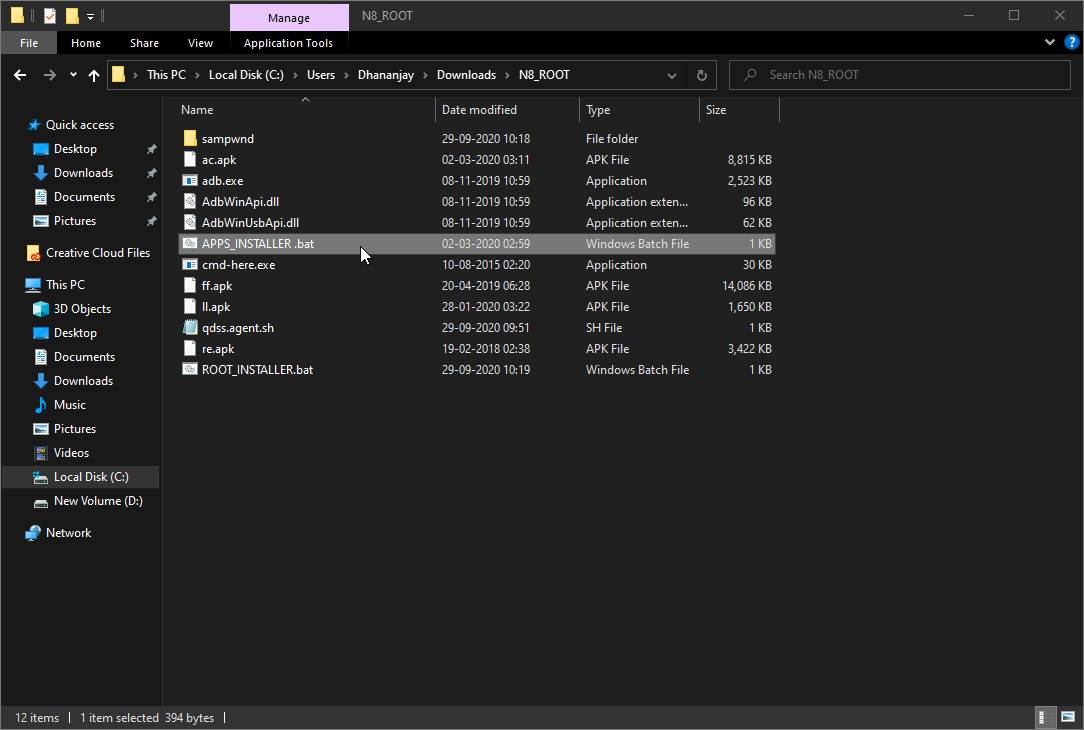
Simply double-click the ‘APPS_INSTALLER.bat’ file to sideload/install the required APK files on your Note 8. Once it finishes, reboot your phone.
Step 4: Grant Read, Write, and Execute permissions to Persist partition
When your phone boots, it should prompt you to select the default launcher application. Choose the ‘Pixel Launcher’ as it would make it easier for you to find the installed apps.
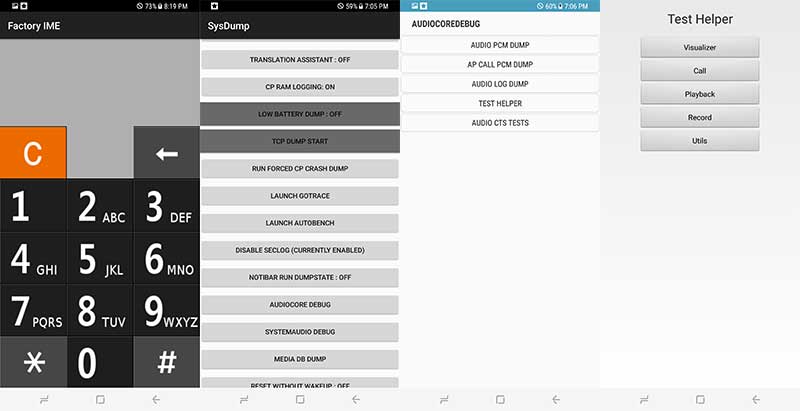
Then launch the ‘Factory IME‘ application from the app drawer and input *#9900# in the dialer. This should open the ‘SysDump‘ screen that will show a lot of different debugging tests. Scroll down, select ‘AUDIOCORE DEBUG‘, then ‘TEST HELPER‘, and finally ‘Utils‘.
You should now see the ‘AUDIOCOREDEBUG‘ screen with a couple of options. Tap on the box that says ‘ADB Commands‘ and type in: chmod -R 0777 /persist. Hit enter on the keyboard and press the ‘SEND‘ button. The command will basically grant read/write/execute permissions to the /persist partition of your Note 8.
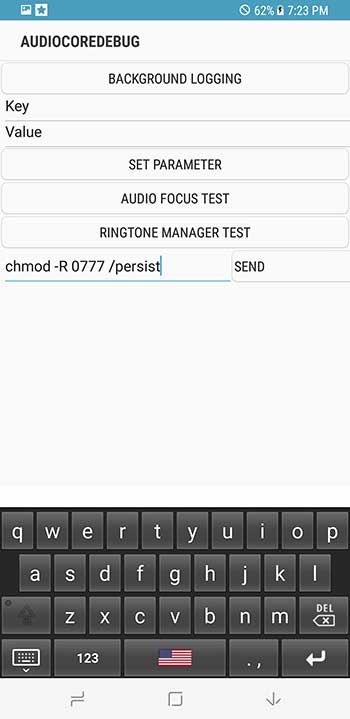
The command will not return output or show a notification to confirm. You just have to make sure that you input the right command and send it over to your device.
Step 5: Run ROOT_INSTALLER.bat to root Galaxy Note 8 Snapdragon
You now have to run the other script on your computer to root your Galaxy Note 8 on the combination firmware. To do this, make sure that your phone is connected to the computer and is recognized by it. Then double-click the ROOT_INSTALLER.bat file.
The script will copy all the required root binaries and reboot your phone automatically. When your Note 8 boots, it should be rooted via SuperSU. Rebooting again will take your phone into SafeStrap Recovery mode. The recovery is based on TWRP and follows the same UI.
Step 6: Install the Pre-Rooted Nougat ROM
The process isn’t over yet. As you may notice, the phone is still running the combination OS. You can now use SafetStrap to flash the pre-rooted Nougat ROM. This ROM comes with both SafetStrap and FlashFire pre-installed. The developer has also removed a bit of bloatware, as well as the KNOX system services.
To install the pre-rooted Nougat ROM on your Galaxy Note 8 Snapdragon, download the following files on your computer first:
- system_n8_brb4.7z (Pre-rooted Nougat system image)
- SuperSU_System.zip or Magisk_System-v21_2.zip
- This is not systemless Magisk; MagiskHide and modules will not work; SuperSU is more stable and recommended.)
- BL_N950U_NOUGAT_V8.tar.7z (Fix for fingerprint and face unlock)
- Safestrap-4.10-B03-GREATQLTE-NOUGAT.zip (Optional, in case the phone keeps looping into SafetStrap)
Extract the “system_n8_brb4.7z” package to get the Nougat system image. Copy the extracted “system_n8_brb4.img” along with “SuperSU_System.zip” and “Safestrap-4.10-B03-GREATQLTE-NOUGAT.zip” files to the phone’s internal storage.
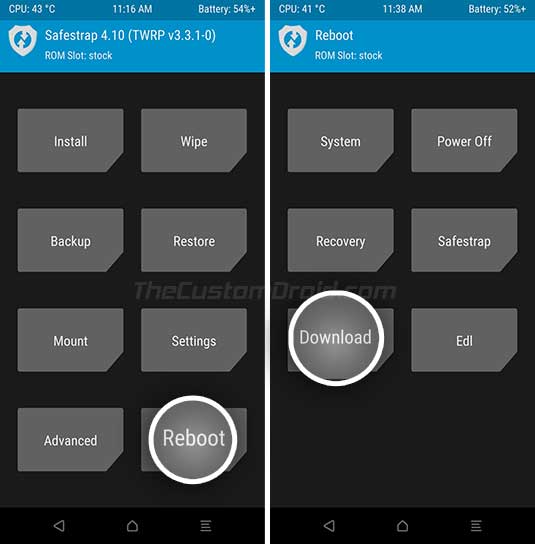
After this, reboot your Note 8 and select ‘Recovery’ from the SafeStrap splash screen. In Safestrap, tap on the “Install” button and then on “Install Image”.
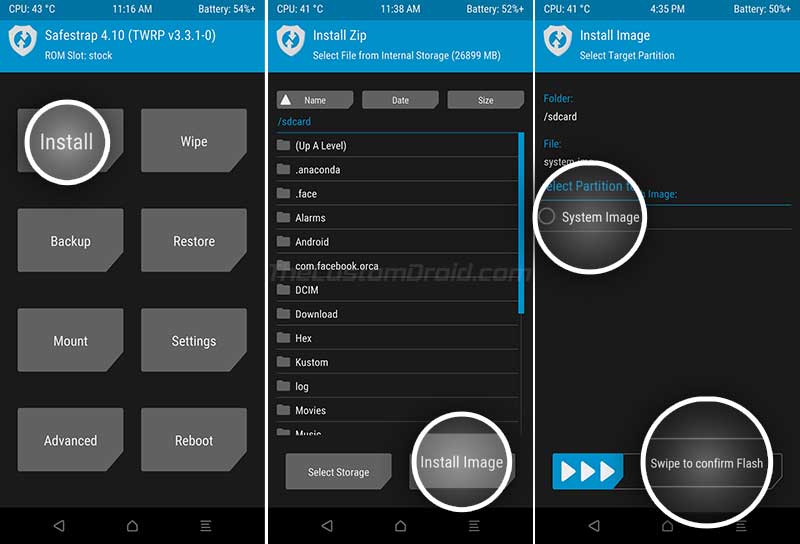
Navigate to your phone’s internal storage and select the “system_n8_brb4.img” file. When prompted to select the target partition, choose “System Image”. Swipe the button on the bottom to flash the pre-rooted Nougat System Image on your Galaxy Note 8 Snapdragon.
Now go back to the recovery’s main menu and press the “Install” button again. Select the “SuperSU_System.zip” file and flash it.
Once done, go to the “Reboot” menu and tap on “DOWNLOAD”. Your phone should now reboot and enter the Download Mode. Connect your phone to the PC while it is in Download Mode.
Then launch the modded version of Odin on your computer and load the “BL_N950U_NOUGAT_V8.tar.md5” file in the “BL” slot. Finally, click on the “Start” button to flash the file.
Once the flashing process finishes, your Note 8 will automatically reboot into the pre-rooted Android Nougat OS. You can now start using your favorite root applications or use SafetStrap to flash mods like ViPER4Android, etc.
No comments :
Post a Comment